Welcome to the official Xpose Content Plugin page; we’re excited to have you here! If you’re looking for a smarter, more efficient way to manage your content inside WordPress, you’ve come to the right place. The Xpose Content Plugin is designed to help content creators, marketers, and website managers streamline their publishing workflow, gain clear visibility over their posts and pages, and make data-driven decisions with ease.
Before diving in, make sure you’ve downloaded and installed the plugin on your WordPress site. If you haven’t done that yet, we highly recommend downloading it now to understand all the features capabilities. It’s simple to install and takes just a few seconds to activate. Once active, you’ll have instant access to an intuitive content management dashboard within your WordPress admin panel.
On this page, we’ll walk you through the plugin’s main features, show you how to get started, and answer some of the most common questions from new users. Whether you’re running a blog, managing an e-commerce site, or leading a content team, the Xpose Content Plugin is built to give you clarity, control, and consistency across all your digital content. Let’s explore what it can do for your content strategy.
How to Install Xpose Content
Installing a plugin on WordPress is a fundamental task for expanding your website’s functionality, and it’s especially relevant when working with tools that support content marketing strategies. Whether you’re optimizing for SEO, automating tasks, or managing editorial workflows, plugins are powerful allies.
In this explanation, we’ll walk you through the process of installing the Xpose Content plugin, following best practices to ensure a smooth and secure installation.
Access the WordPress Dashboard: To begin, log into your WordPress website using an admin account. Once inside the admin dashboard, locate the menu on the left-hand side and hover over the option labeled “Plugins.” Click on “Add New.” This action will take you to the WordPress plugin repository where you can search, install, and activate new plugins.
Search for the Xpose Content Plugin: In the “Add Plugins” page, you’ll find a search bar in the top-right corner. Type “Xpose Content” into the field and press Enter. WordPress will display a list of results matching the keyword. Look for the official Xpose Content plugin (usually verified by the developer name or logo), and make sure the plugin is compatible with your current WordPress version.
Install the Plugin: Once you’ve located the correct plugin, click the “Install Now” button. WordPress will begin downloading and installing the plugin files directly to your site. This process typically takes just a few seconds, depending on your server’s speed.
Activate the Plugin: After the installation is complete, the same button will change to “Activate.” Click it to enable the Xpose Content plugin on your website. Once activated, the plugin will be ready for use, and its features will be accessible either through a dedicated menu in the dashboard or integrated into existing content management sections, depending on its design.
Keep the Plugin Updated: After installation, it’s crucial to keep the Xpose Content plugin updated. WordPress will notify you whenever a new version is available. Updates often include security patches, performance improvements, and new features, so it’s recommended to apply them regularly via Plugins > Installed Plugins.
Installing the Xpose Content plugin (or any WordPress plugin) is a straightforward process that can significantly enhance your content marketing capabilities.
By following this step-by-step approach, you ensure a smooth installation, minimize risks, and make the most of what the plugin has to offer. Proper setup and regular maintenance will help your site remain efficient, secure, and aligned with your digital strategy.
How to Use Xpose Content
The Xpose Content plugin for WordPress is designed to help content creators, marketers, and website managers maintain control over their digital publishing efforts.
Acting as a full-featured Content Manager, this plugin provides intuitive dashboards with content performance insights and export capabilities. Once installed and activated, it streamlines the organization, tracking, and reporting of all published content types: making it especially valuable for teams focused on content marketing and SEO strategies.
Below, we explain how to use the plugin’s core features step by step.
Accessing the Xpose Content Dashboard
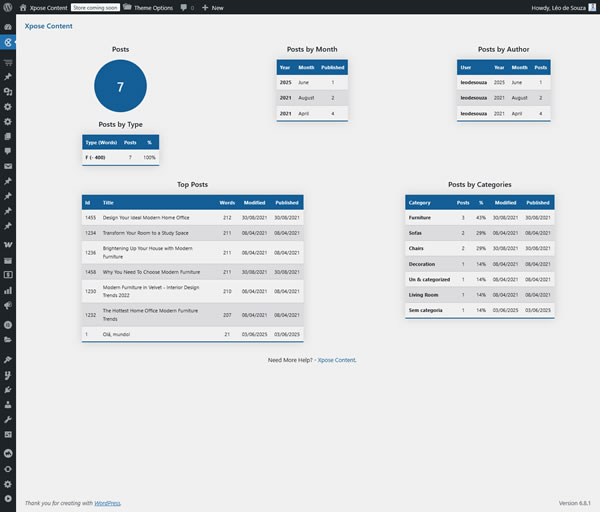
After installing and activating the Xpose Content plugin, a new item labeled “Xpose Content” will appear in the WordPress admin menu. Clicking on it will take you to the main Content Metrics Dashboard. This dashboard provides an overview of your published posts, including key metrics that help you monitor content performance.
On the main dashboard, we have metrics like total number of posts, average word count, and posting frequency per author. This overview helps users quickly assess how active their content strategy is and identify any gaps in production or scheduling. It’s especially useful for editorial planning and performance tracking over time.
Viewing Content Panels: Pages, Posts, Products, and Custom Post Types.
The plugin includes dedicated panels for each type of content published on your WordPress site. You can find separate tabs or sections for:
- Pages
- Posts (Blog Articles)
- Products (for WooCommerce users)
- Custom Post Types (like Portfolios, Case Studies, Testimonials)
Each dashboard provides a detailed view of the published content within that category. You’ll see a list of items, including title, published date, modified date, and other metrics. This centralized view allows content managers to easily navigate and manage all their digital assets without having to navigate multiple admin sections.
This feature is particularly useful for large websites, editorial teams, or e-commerce businesses that need to monitor the structure of dozens or hundreds of content pieces across different formats.
Exporting Content to Spreadsheets
One of the Xpose Content plugin’s standout features is its ability to export all WordPress content to spreadsheets. Within each panel (Pages, Posts, Products, and Custom Post Types), users can easily export the complete list of published content to a spreadsheet format (CSV). This feature allows you to:
- Content Audits
- SEO Analysis and Keyword Mapping
- Editorial Planning and Scheduling
- Team Reporting and Performance Review
To export, simply navigate to the desired dashboard (e.g., “Posts”) and click the “Export to CSV” button; located at the bottom of the dashboard interface. Clicking this will generate a spreadsheet (.csv format) with all the content data available for that category. You can then open this file in Excel or Google Sheets to filter, analyze, or share with your team.
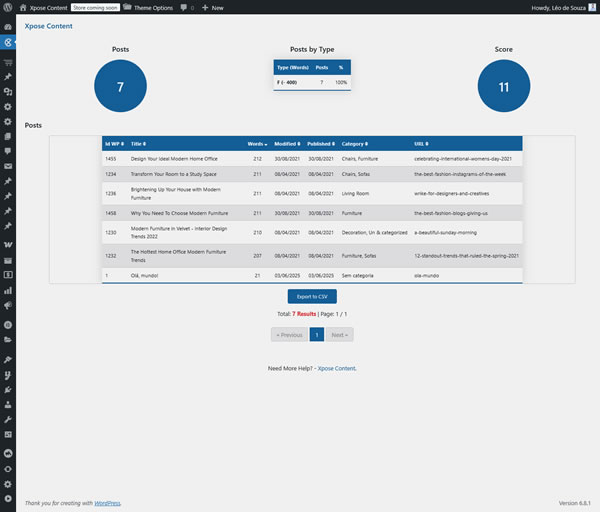
This export capability is especially useful for marketers and strategists who work with external tools or need to present content reports to clients or stakeholders. It also simplifies content maintenance, making it easy to identify outdated, underperforming, or missing pages and articles.
The Xpose Content plugin transforms WordPress into a powerful content management hub, ideal for websites that need to boost their marketing strategy. Through centralized dashboards, detailed content panels, and practical export tools, it gives users full visibility and control over their published materials.
Whether you’re managing blog posts, e-commerce products, or custom post types, this plugin enhances your editorial workflow and supports strategic decision-making through organized, data-driven insights.
That’s it. If you want to see more content, go to Xpose Content official in Portuguese.